This post documents the installation of an IDEA VE11 virtual box on a mac as done on May 14th 2018
Big thanks to Andy for figuring out how this works
Prerequisites
- Here I start with a already built images of IDEA on windows vista and mars on Ubuntu. the images from FMRIF can be taken from erbium.nimh.nih.gov:/fmrif/projects/SiemensIdea/virtual_machines/OVF/): IDEA_ve11c-mars.ova and IDEA_ve11c+vd13d+vd13a.ova
- Virtual box software can be downloaded here.
Importing OVA images into virtual box

This needs to be done for MARS and the Windows image.
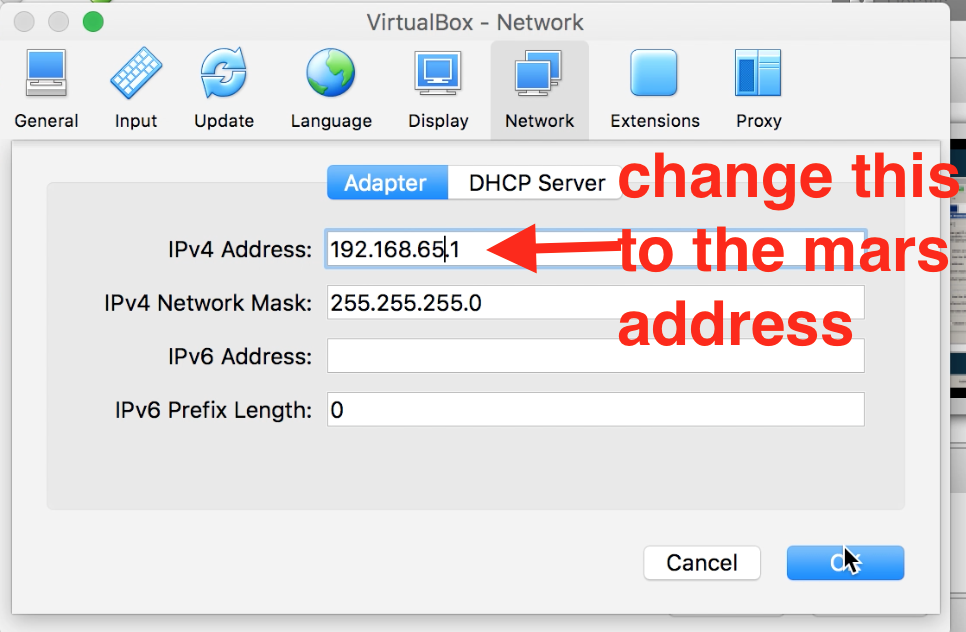
Setting up network for MARS
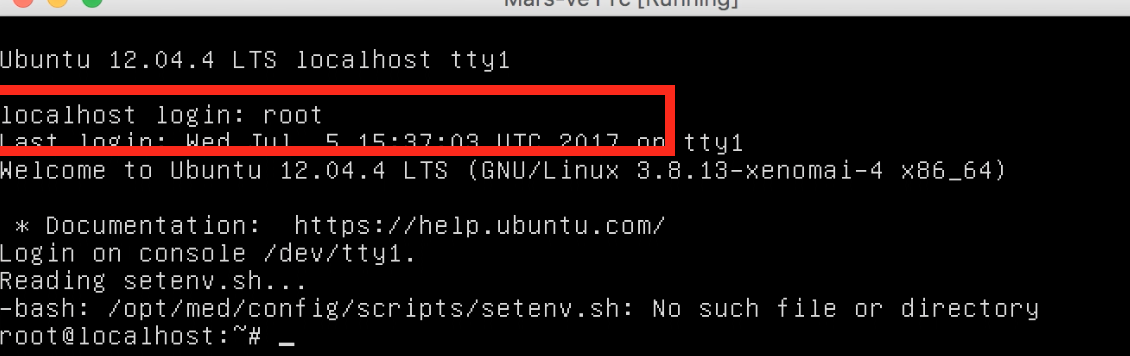
Start mars in VitrualBox with a double click. It might take a while at the beginning with the following message. 
It gives up after a few minutes and you can login as root.
Open the network file withvi /etc/udev/rules.d/70-persistent-net.rules
It might look like the following:

Remove the upper two lines and change the “eth1” to “eth0” and save it. You can remind yourself about the vi shortcuts here.
Then open the file /etc/network/interfaces with
vi /etc/network/interfaces
It might look like the following:

Reboot with
reboot
From now on the booting process should be much faster.

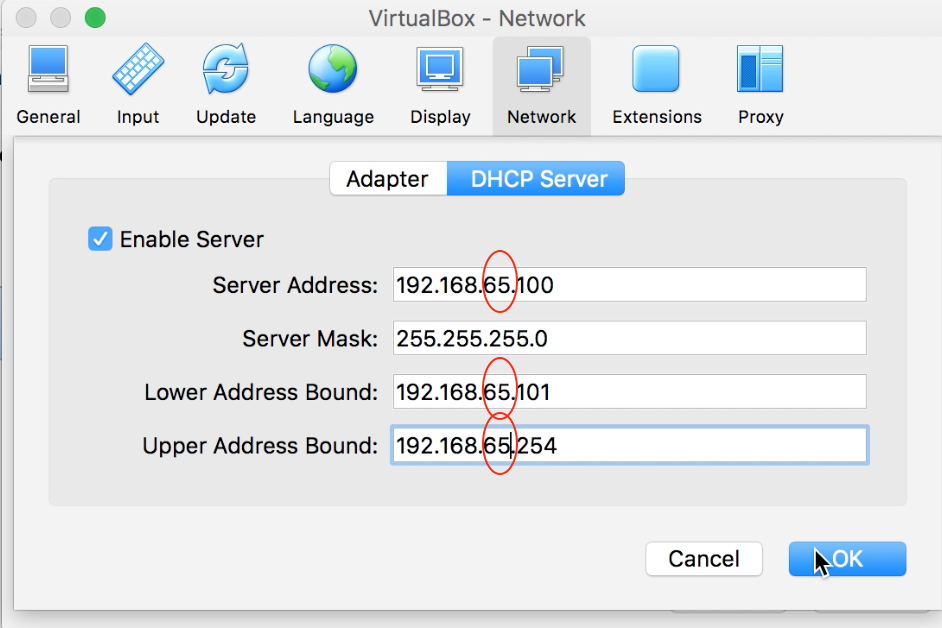
Changing VirtualBox Networks settings of MARS

Make sure that you select the Host-only adapter vboxnet0. In case it is not there you can manually create one by running the following command on the host
$ VBoxManage hostonlyif create
Reboot mars again.
Setting up Windows in Virtual box
Allowing virtual box to resize the screen.
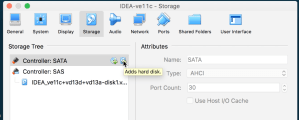
In Virtual box, select the Windows image and go to Storage settings.

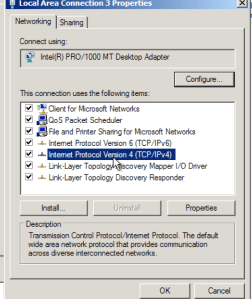
Setting up Windows network preferences
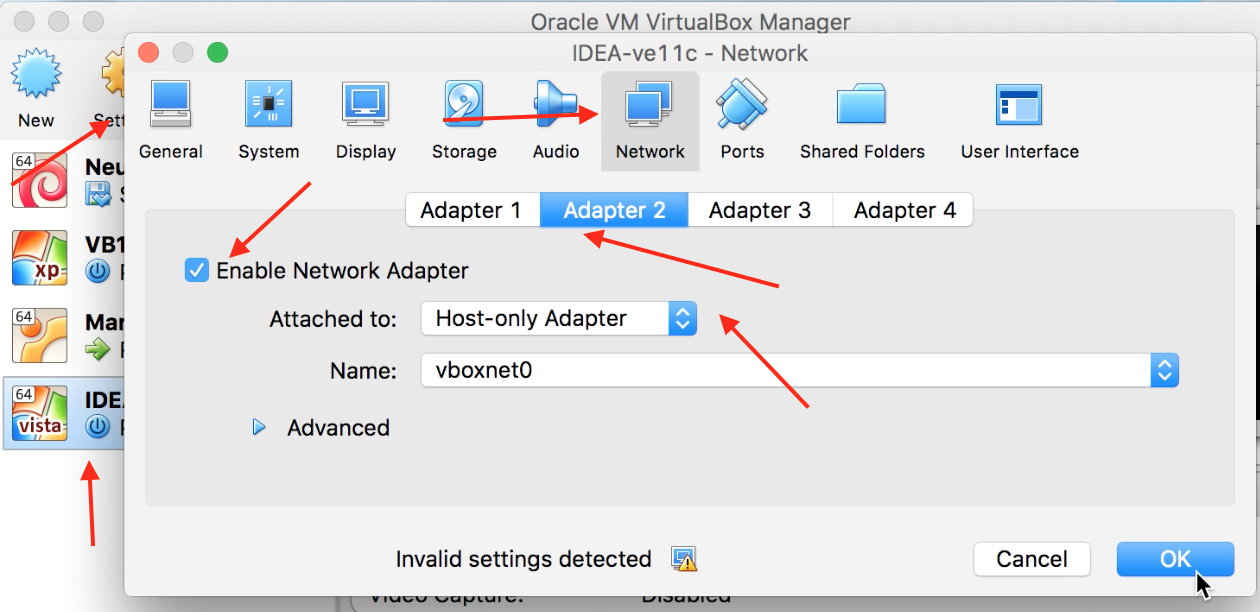
In the VirtualBox menu do the following:
- Select the Windows virtual box
- go to Settings
- Network
- Host-only Networks
- select vboxnet0
- click on the screwdriver

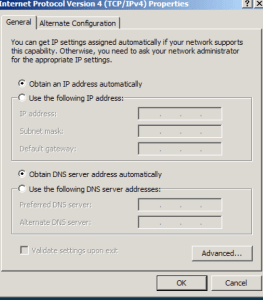
6.) in “Adapter”, change the IP address to the address from mars.
7.) in DHCP change the “65” too.
8.) Include a second Network adapter
9.) Reboot
10.) check the network preferences in Windows:


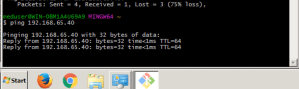
At the end, IDEA needs to know the IP-address of MARS. If this is not set already. it can be done in the IDEA console with

ExternalMars true -ip 192.168.65.40
Setting up shared folder
In the VirtualBox setting, select the virtual box and click on settings. Go the Shared folder and brows to the path of the folder, you want to have access to.

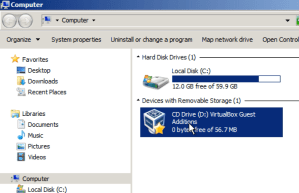
After a reboot, it should be available as a separate drive:

Comment from Alard Roebroeck on Virtual Box 6
“So in Virtual Box 6 (I believe you use 5), the section ‘Setting up Windows network preferences’ works broadly similar, but different in details. Rather than needing to change the Network settings for the virtual machine, you need to change them (especially the ip address for the Host-Only adapter) in VirtualBox-> File -> Host Network Manager… . The host-only adapter is now called ‘Virtual Box Host-Only Ethernet Adapter’ (instead of vboxnet0). All else is pretty much the same, once you replace ‘vboxnet0’ with ‘Virtual Box Host-Only Ethernet Adapter’ in your instructions for the virtual machine network settings.”
Tips for compiling sequences:
- Start IDEA.net as administrator

- The relevant CPP file is the one in the seq folder (not in the sub folder)
- When copying a new sequence into the seq folder prepare it with
regtarg(opposite of unregtarg) and confirm it twice withY. - When you compiled the sequence, there should be a SEQUENCENAME.dll and libSEQUENCENAME.so file.
- Put them both at the scanner (as Advances user) in /Medcom/MRICustomer/seq/
- In Syngo you can import it:
- View -> Dot Cockpit -> ProgramEditor -> Edit -> Default -> Default sequences
- Note that the VE world does no longer have a
cleancommand. Instead you could use the additonal flagcleanor-rebuildwith themc/mscommand.
Installation of additional versions
There are at least four different VE12U versions of Terra platforms
- VE12U (standard Terra)
- VE12U-AP01 (7T Plus or Terra -Fit, a Terra that was upgraded from a classical MAGENTOM 7T)
- VE12U-SP01 (standard Terra with deuterium capabilities)
- The Feinbergatron
If you have one version running, you can install additional version rather straightforwardly:
- RENAME your C:\MIDEA\N4_VE12U_LATEST_20181126 to C:\MIDEA\N4_VE12U_LATEST_20181126_original (or whatever). (comment on Feb 19th 2021: this seems to cause conflicts with SnapShotview, prohibits communication with external mars. So you might need to sacrifice the previous old version).
- Mount the ISO and load readme.hta, (or better: execute the ideainstall.cmd with administrator privileges).
- Choose to install and pick the normal options, eg. we use “externalmars”.
- I then RENAME the newly created C:\MIDEA\N4_VE12U_LATEST_20181126 to C:\MIDEA\N4_VE12U_LATEST_20181126_SP01_pre so I don’t get confused (comment on Feb 19th 2021: this seems to cause conflicts with SnapShotview, prohibits communication with external mars. So better leave the name).
- Then start IDEA.NET and you’ll have a choice of either version to start up.
The MARS should be unaffected and run with all versions.
Compilation of ICE Functors on VE
- place all the necessary files in \n4\pkg\MrServers\MrVista\Ice\IceIdeaFunctors\IceYOURFUNCTOR. File might be: Makefile.imk, Makefile.trs, IceFUNCORNAMEConfigurator.cpp, IceFUNCORNAMEConfigurator.h, IceFUNCORNAMEFunctor.cpp, IceFUNCORNAMEFunctor.h, README, ObjectMap,
- in the terminal go to this folder,
- type
regtargand confirm it twice withY - compile with
mi - compiled files are in \n4\x86\prod\bin (dll and evp) and \n4\linux\prod\lib (lib….so), and in C:\Users\CIND\AppData\Local\Temp. These filed contain, libIceFUCOTRNAME.so, IceFUCOTRNAME.dll, IceFUCOTRNAME.evp
- you need to place the files at the scanner on MriCustomer\ice\, (.evp, .dll, .so, .irp)
Note that VE11C ice binaries re not compatible with VE12U versions. However, different VE12u versions (native, AP01, SP01) seem to be binary compatible.
Trouble shooting
- IDEA Doctor sometimes can help to troubleshoot. “All Programs” -> “IDEA” -> “IDEA Doctor”.
- If IDEA-Doctor has MARS or compilation related issues, VboxCtrl commands (e.g. -ReinstallVM, -InitUser, -Start/-Stop/-Restart) can be able to do the trick.
