The purpose of this blog post is to provide guidance on how to get started with the layer-fMRI analysis suite: LAYNII. This post is an extended version of the LAYNII README.
LAYNII is a stand-alone software suite in C++ that should be usable on Linux, macOS and Windows. You can get started in two ways.
- Download precompiled binary files,
- Or download the source code and compile it on your own.
Dependent on your specific system or your level of IT expertise, either way can be easier.
The compilation of the source code in option 2. should work without any dependencies beyond a C++ compiler (any compiler since 2011 should work).
Below, you find step-by-step instructions on how to set up LAYNII on the various operating systems by using the binaries or by compiling the source code, respectively. The last two sections of this blog post describe ways how to use pre-installed versions of LAYNII, in a virtual NeuroDebian, or from a Docker container, respectively.
macOS
Setting up pre-compiled LAYNII binaries on macOS
The pre-compiled binaries for macOS have been successfully tested across a few systems without large problems (until CATALINA). If you have a newer system than CATALINA, we recommend that you compile LAYNII on your own (see section below).
- Downloading: Please download the pre-compiled binaries from github here: https://github.com/layerfMRI/LAYNII/releases, unzip them, and store them at a convenient location on your computer. E.g., I keep it directly in my home directory
mv -r ~/Downloads/LAYNII ~/LAYNII.
- Testing: If you want, you can check LAYNII with a test program LN2_LAYERS by typing
./LN2_LAYERSin your terminal within the LAYNII folder. The output should not give you an error, and it should look similar to this.
output in the terminal after executing LN2_LAYERS without an error It you want to exhaustively test all of the LAYNII programs with real example data, you can do so in the subfolder
test_datawith the prepared commands in thetest.shscript file. - PATH: If you want to make them executable from any location on your computer, it is recommended to include the location of the LAYNII binaries to your paths within your terminals profile file. To do this, please open the ~/.bash_profile (or ~/.zprofile) in your home directory with a text editor and add a line at the bottom with the specific path location:
export PATH=$PATH:/Users/YOUR_USER_NAME/LAYNII. In case this profile file does not exist, you can just create it by means oftouch ~/.zprofile.
The top line opens the bash_profile in your default text editor. The bottom of the figure shows how the path is included for me. Dependent on where you stored LAYNII and what your username is, your path will look different. Note, there are some rare macOS system setups where your profile file name is .profile instead of .bash_profile.
The terminal needs to be restarted for the path to be activated.
Compiling LAYNII on macOS
If -against all odds- the precompiled binaries do not work for you, or if you want to develop your own LAYNII features, you can also compile LAYNII on your own macOS by following the steps below:
- Downloading: Download the source code from Github. You can either download it by cloning it with git in your terminal with
git clone --depth 1 https://github.com/layerfMRI/LAYNII. Alternatively, you can download it here by clicking the Download ZIP button and unzip it on your computer. You can choose, where you want to keep it. E.g., I keep it in my home directory
 mv -r ~/Downloads/LAYNII-master ~/LAYNII. - Compiling: Open a terminal and go to the LAYNII directory. There, you can compile it with the command
make all(if you do not have Xcode installed, the mac will ask you to install it, which you can do by clicking “install”). Now, all the binaries of LAYNII, should be in the local LAYNII folder. Dependent on the macOS version that you are using, you might need to have command line tools enabled for the above step to work. Alternatively to command line tools, you can also do it by having g XCode installed, unless you have gcc installed via homebrew already anyway. The vast majority of mac users in academia have this set up already and not further setups are necessary.
 - Testing: If you want, you can check LAYNII with a test program LN2_LAYERS by typing
./LN2_LAYERSin your terminal within the LAYNII folder. The output should not give you an error, but should look similar to this.output in the terminal after executing LN2_LAYERS without errors It you want to exhaustively test all of the LAYNII programs with real example data, you can do so in the subfolder
test_datawith the prepared commands in thetest.shscript file. - PATH: If you want to have the binaries executable from any location on your computer, you should include the location of the LAYNII binaries to your paths in your terminal’s profile file. To do this, please open the .bash_profile (or .zprofile) in your home directory with a text editor and add a line at the bottom with the specific path location:
export PATH=$PATH:/Users/YOUR_USER_NAME/LAYNII. In case this profile file does not exist, you can just create it by means oftouch ~/.zprofile.
Note, there are some rare macOS system setups where your profile file name is .profile instead of .bash_profile.
Note, the terminal needs to be restarted for the path to be activated.
Linux
Setting up LAYNII binaries on Linux
Until now, we did not hear of any experiences, where the binary installation did not work right out of the box. Thus, on Linux systems, we recommend the installation via binaries.
- Downloading: Please download the pre-compiled binaries from github here: https://github.com/layerfMRI/LAYNII/releases, unzip them, and store them at a convenient location on your computer. E.g., I keep it in my home directory
mv -r ~/Downloads/LAYNII ~/LAYNII.
- Testing: If you want, you can check LAYNII with a test program LN2_LAYERS by typing
./LN2_LAYERSinto the console in your LAYNII folder. The output should not give you an error, but should look similar to this.
This is how it should look when you execute LN2_LAYERS. There is no error message. If you want to exhaustively test all of the LAYNII programs with real data, you can do so in the subfolder
test_datawith the prepared commands in thetest.shscript file. - PATH: If you want to make them executable from any location of your computer, you should include the location of the LAYNII binaries to your paths in your .bashrc file. E.g., by opening it with a text editor and adding a line at the bottom with the specific path location
export PATH=$PATH:/Users/YOUR_USER_NAME/LAYNII.
The top line opens the .bashrc in my default text editor (for me it’s gedit). The bottom of the figure shows how the path is included for me. Dependent on where you stored the downloaded binaries of LAYNII and what your username is, your path will look different.
Compiling LAYNII on Linux
If you want to change LAYNII code or add your own LAYNII program, you can also compile LAYNII on your own.
- Downloading: Download the source code from github here: https://github.com/layerfMRI/LAYNII/releases, unzip them and store them at a convenient location on your computer. I keep it in my home directory
mv -r ~/Downloads/LAYNII-master ~/LAYNII.
- Compiling: Open a terminal window and go to the LAYNII directory. There, you can compile it with the command
make all. Now, all the binaries of LAYNII, should be in the local LAYNII folder. Upon LAYNII version v1.5.5, this should work across all current linux distributions without additional installations necessary.
 - Testing: If you want, you can check LAYNII with a test program LN2_LAYERS by typing
./LN2_LAYERSin the console within the LAYNII folder. The output should not give you an error, but should look similar to this.This is how it should look when you execute LN2_LAYERS. There is no error message. It you want to exhaustively test all of the LAYNII programs with real data, you can do so in the subfolder
test_datawith the prepared commands in thetest.shscript file. - PATH: If you want to make them executable from any location on your computer, you can include the location of the LAYNII binaries to your paths in your .bashrc file. E.g., by opening it with a text editor and adding a line at the bottom with the specific path location
export PATH=$PATH:/Users/YOUR_USER_NAME/LAYNII.The top line opens the .bashrc in my default text editor (for me it’s gedit). The bottom of the figure shows how the path is included for me. Dependent on where you stored the downloaded binaries of LAYNII and what your username is, your path will look different.
Windows
Unfortunately, Windows is the operating system, with which we had most reports of troubles regarding using pre-compiled binaries. Thus, we recommend to Windows users that they compile LAYNII locally on their own. Though this can be a bit involved, it is the safest way to avoid issues.
Compiling LAYNII on Windows
- Downloading: Please download the source code from github here: https://github.com/layerfMRI/LAYNII/releases, unzip them, and store them at a convenient location on your computer. E.g., I keep it on my Desktop.
- Compiling: Open a command tool (E.g. by opening Run and typing in
CMD). And go to the LAYNII directory. Since most Windows systems do not have make natively installed already, it can be most convenient to manually compile all LAYNII programs by copy pasting the corresponding lines from the README.md file (included in the downloaded the zip) in the CMD window. (Note, the README file will be updated across the LAYNII versions to always contain a complete list of all LAYNII programs).
  This step only works, if you have a C++ compiler installed. Unfortunately, however, Windows does not come along with a ready-to-go C++ compiler, nor is it straightforwardly installable. Though, you can install it manually by means of installation helper software. I found it easiest to use cygwin. And I followed these video instructions. Additional to all the packages that this video goes through, you also need to add zlib. This takes about 10-20 min and will allow you to execute the above copy-pasted lines.
 - Testing: If you want, you can check LAYNII with a test program LN_LAYER_SMOOTH by typing
LN_LAYER_SMOOTH.exe. The output should not give you an error, and should look similar to this. It you want to exhaustively test all of the LAYNII programs with real data, you can do so in the subfolder
 test_datawith the prepared commands in thetest.shortest_on_windows.shscript file. Note, that this file is different from the Linux and macOS versions due to the different backslash conventions: / vs. \. - Setting the PATH. If you want to make the generated exe files executable from any location on your computer, you can include the location of the LAYNII binaries to your paths in your system environment. You can add the path of your LAYNII executables with the following click sequence:
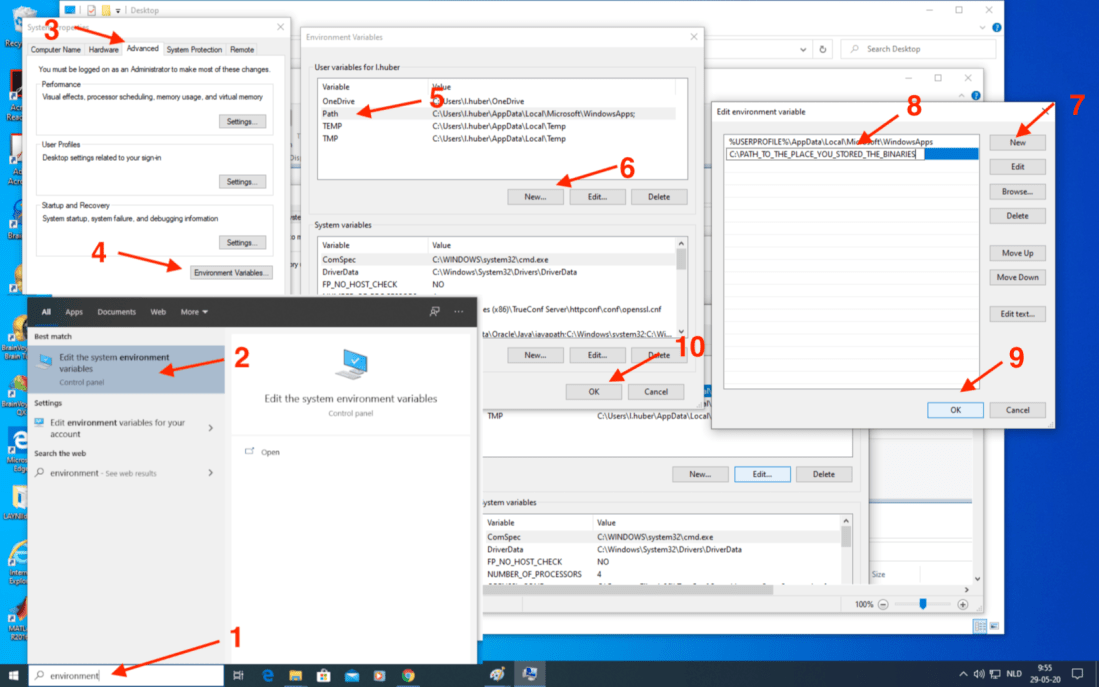
click sequence to add the LAYNII path to your system environment
Setting up LAYNII binaries on Windows
If you really really want to, you can try to use the pre-compiled binaries instead of compiling it on your own by following the steps below.
- Downloading: Please download the pre-compiled binaries for your Windows version from github here: https://github.com/layerfMRI/LAYNII/releases, unzip them and store them at a convenient location on your computer.

- Testing: If you want, you can check LAYNII with a test program LN_LAYER_SMOOTH by typing
LN_LAYER_SMOOTH.exe. The output should not give you an error, and should look similar to this.If you want to exhaustively test all of the LAYNII programs with real data, you can do so in the subfolder test_datawith the prepared commands in thetest.shortest_on_windows.shscript file. Note, that this file is different from the Linux and macOS versions due to the different backslash conventions: / vs. \. In many cases, LAYNII users on Windows systems reported error messages like: certain dlls would be missing. E.g. a subset of the following: cyggcc_s-1.dll, cyggcc_s-seh-1.dll, cygstdc++-6.dll, cygwin1.dll, or cygz.dll. Thus, all of these dlls are provided with the binary packages (included in the zip file). However, in order for the computer to use them, the corresponding PATH must be set, as described in the next step. - Setting the PATH. If you want to make them executable from any location of your computer, you can include the location of the LAYNII binaries to your paths in your system environment. You can add the the path of you LAYNII executables with the following click sequence:
Click sequence to add the LAYNII path to your system environment. The dlls should be in the same location.
Alternative ways of using LAYNII
Using pre-installed LAYNII versions in NeuroDebian
If you want to use LAYNII without installing it, you can use a pre-installed version on a virtual box of NeuroDebian. The entire NeuroDebian operating system with LAYNII, AFNI, ANTS and a few other pre-installed programs can be downloaded here: https://layerfmri.page.link/virtual_layering (file size is 4GB). In order to use it, you need to have the program virtual box installed and import the downloaded appliance.
Using pre-installed dockerized LAYNII
If you want to use LAYNII without installing it, you can also use a Docker Container.
Pulling an already built LAYNII docker
- Have docker installed
- Download the container with this command
docker pull layerfmri/laynii_v2.0.0or see instructions on DockerHub: https://hub.docker.com/r/layerfmri/laynii_v2.0.0 (file size 400 MB).
Building your own LAYNII Docker
If you want to build your own docker container that has LAYNII pre-installed in it, follow the steps explained below:
- Have docker installed
- Download this file, unzip it and keep its filename Dockerfile: Dockerfile (file size 610 bytes)
- In the folder of the Dockerfile execute
docker build -t docklaynii . - You can test is with
docker run --rm -it -v $PWD:/data docklaynii ./LAYNII/LN_LAYER_SMOOTH -h - You can use is to run stuff with
docker run --rm -it -v $PWD:/data docklaynii ./LAYNII/LN_INFO -input ./LAYNII/test_data/sc_layers.nii -sub 5
Thanks to Sri for introducing me to Docker and showing me the first examples.
Problems during the installation?
If you have gone through the above steps and it still doesn’t work for you, please submit a github issue here: https://github.com/layerfMRI/LAYNII/issues. There, Faruk, I and many other LAYNII users might be able to help you as soon as possible.

Addendum: This post refers to LAYNII versions v1.5.5 and newer. It the described setup has not been tested for older versions.
